2 d Design a Building Grade 5 Lesson in Art
Download Lesson 1 (68KB)
Math and art comingle in this first lesson, which gets students to think about shapes and objects from dissimilar perspectives. The information here prepares students for sketching and graphically rendering golf game holes in hereafter lessons.
Before offset this lesson, define the projection's goals. Will students build a playable mini-golf course from their designs? If so, when and where? Or will students just acquire basic techniques? Be sure to discuss with students the project'south calendar, keeping an open communication channel throughout the curriculum.
Lesson Objectives and Materials
Objectives
- To define and recognize a multifariousness of polygons
- To represent the same shape in 2 and three dimensions in social club to practice 3-point-perspective cartoon
Materials:
- graph paper
- protractors
- pens and pencils
- rulers
- objects or graphics representing dissimilar polygons
Engaging Students
Become your students interested in the lesson by request them for the following data:
- Ask for definitions and examples of ii-D, 3-D, orthographic cartoon, polygons, and perspective. (Come across the glossary for definitions.)
- Ask them to find specific polygons in the classroom or in their lives -- for example, a stop sign or the chalkboard.
- Ask for examples of movie studios that make films primarily in two-D (Disney's older films) and primarily in 3-D (Pixar).
Project Application: 2-D Drawing
Ask students to draw a rectangle and another polygon of their choice in 2-D -- first in freehand and then using a ruler and graph paper. Hither are some tips for practicing certain skills:
- To practice perimeter and area, assign students lengths and widths for the rectangle.
- To practice calculation, try changing the measurements.
- To practise interpretation, convert from standard measurement to metric measurement and back again.
- To help struggling students, accept them practice drawing a polygon until they're more comfortable using a pencil, a ruler, and graph paper.
Projection Application: 3-D Perspective Drawing
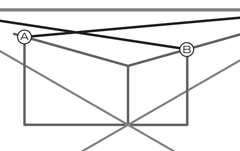
Perspective drawing requires finding the vanishing indicate and drawing rays that extend from that point. Go your students to draw a 3-D rectangle in perspective by asking them to follow these steps:
Download Perspective Drawing Instructions (364KB)

Credit: Damien Scogin
Step 1 + 2. Click hither for full analogy
i. Using a piece of 2- by iii-human foot blank paper or graph paper (A) oriented horizontally (landscape style), describe a line that bisects the paper from left to right (B). This is the horizon line.
2. Brand a small-scale x toward the left finish (C) of the horizon line and another toward the right end (D). These are the vanishing points, the two points to which all visual lines atomic number 82.
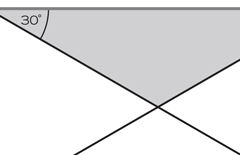
3. Use a protractor (or estimate) to draw a xxx-degree angle at each vanishing betoken, extending the rays of the angle toward the bottom of the newspaper until they meet to create a large isosceles triangle.
Credit: Damien Scogin
STEP 3. Click here for full illustration
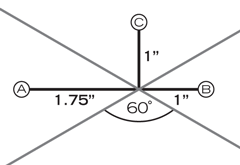
4. Form the base of a 3-D rectangle by cartoon a dark 1.75-inch horizontal line from the bottom point of the triangle to the left. Then draw a dark one-inch line from the bottom point of the triangle to the right.
five. Draw a 1-inch vertical line from the lesser point of the triangle upwardly.
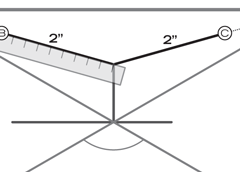
six. Draw a 2-inch line extending from the tiptop of the vertical line to the left vanishing point (where the student put the kickoff ten on the horizon line). The line should not connect to the x. Repeat for the correct vanishing indicate.
Credit: Damien Scogin
STEP 4 + 5. Click here for full illustration
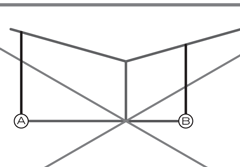
seven. Draw a vertical line that connects the left edge of the bottom line (the base of the rectangle) to the left edge of new line you created in step six. Repeat for the right border.
8. Complete the three-D rectangle by drawing a line from the top of the right vertical line to the left vanishing point. And so repeat the process by connecting the left vertical line to the correct vanishing point.
If students are having trouble creating the rectangle, ask them to echo the practise, and help them when needed. Students who feel comfy with the practise tin repeat information technology using different polygons.
Credit: Damien Scogin
STEP six. Click here for total analogy
Step 7. Click here for total illustration
STEP 8. Click here for full illustration
Credit: Damien Scogin
COMPLEX POLYGON WITH 2-POINT PERSPECTIVE. Click here for full illustration
If some students come to class with drawing skills, inquire them to freehand simple 3-D shapes (for case, a shoe box, a brick, dice, a cup, a chair, a tabular array).
Project Application: Introduction to Orthography
Help your students visualize objects from the three views of orthographic drawings: program, side, and front. Yous volition further develop orthographic drawings in Lesson 4. Here are some pointers to whet your students' orthographic appetite:
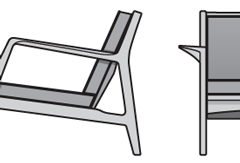
Credit: Damien Scogin
Click here for total analogy
- Enquire students how many means they call back they can draw their polygon.
- Grade groups, and ask each group to expect at the aforementioned complex item (a chair, a bicycle, or a backpack) from a different viewpoint -- one group from pinnacle downward (the plan view), another group from the side (the side view), and another group in front end of the object (the front view). Discuss what students exercise and don't encounter from each angle.
- Explicate what each view ways and its relationship to orthographic drawing.
- Ask students why architects create multiple illustrations of a edifice in dissimilar perspectives. How practise multiple designs assistance in planning the building? Why is this important to investors and in the construction procedure?
Student Assessment
At the stop of this lesson, yous should have a skillful thought of each student's understanding and skill level with polygons, cartoon in perspective, and the other concepts covered. Here are some guiding points to assistance assess each educatee.
The student'due south mastery of the subject thing is
- first-class: Students can differentiate between true polygons and other shapes and represent them accurately (ii-D and three-D are correctly drawn) and with a sense of limerick.
- good: Students tin differentiate between true polygons and other shapes and represent them accurately.
- fair: Students frequently spot polygons merely mislabel some shapes; drawings are inaccurate or lack the depth of three dimensions.
- Poor: Students do non differentiate between polygons and other shapes; iii-D drawings expect two-D.
Vocabulary
We use these terms throughout this and other Build SF lessons:
- Polygon: A airtight shape with three or more sides, such as a triangle, a square, or a pentagon.
- two-D: A description of an object that has only two dimensions, usually only length and width.
- 3-D: A clarification of an object that has 3 dimensions, ordinarily length, width, and meridian.
- Orthographic drawings: A series of related drawings from multiple viewpoints (usually top, side, and front end) that evidence a iii-D object in two dimensions.
- Perspective: A method of seeing and drawing that allows artists to represent three-D scenes in two dimensions.
Key Points
Review the following concepts before beginning this lesson:
- Geometry
- Orthography
- Perspective drawing
Source: https://www.edutopia.org/build-sf-lesson-perspective-drawing
0 Response to "2 d Design a Building Grade 5 Lesson in Art"
Post a Comment